Intro to Vue Transitions
July 17, 2019 By Spenser Peiffer, aka Snazzy Boi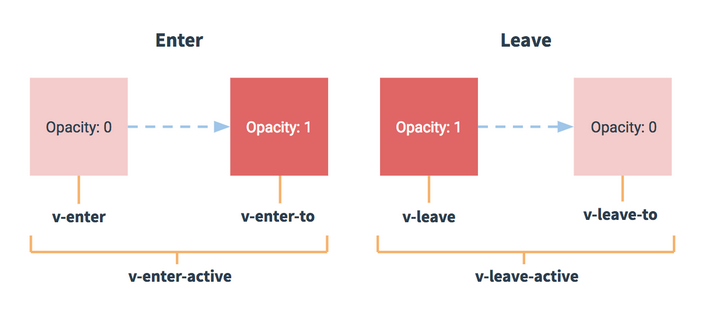
Learning how to do a Vue transition comes in handy any time Vue is changing the DOM. We’ll get to multiple Vue transitions soon enough. But, first, we’ll look at how to do a single Vue transition. In order to do this, we will make a simple app where, when you click a button, a number in a box will increment up. By the end, the number changing will be animated. Consider this your intro to Vue transitions:
1. Set up the App Without the Transition
To start, let’s set up our app without the transition parts.
Just to run through it very quickly, we will have an element called `#app` that will act as the Vue instance’s virtual DOM and a data variable called `number`. When a button is clicked, it will fire a function in the method called `count` which will increase `number` by one. If you just want to start there, then grab the code below:
HTML
<div id="app">
  <div class="box">
  <span>{{number}}</span>
  </div>
  <button @click="count">Count +</button>
</div>
SCSS
body{
  display: flex;
  width: 100%;
  height: 100vh;
  justify-content: center;
  align-items: center;
  font-family: 'Montserrat',sans-serif;
  font-weight: bold;
}

.box{
  min-width: 50px;
  height: 70px;
  border: solid 2px orange;
  display: flex;
  justify-content: center;
  align-items: center;
  font-size: 1.9em;
  overflow: hidden;
}

button{
  border: solid 2px orange;
  width: 150px;
  background: orange;
  margin: 10px 0;
  color: #fff;
  font-size: 1.3em;
  padding: 10px;
  cursor: pointer;
  font-family: 'Montserrat',sans-serif;
  font-weight: bold;
}
VUE.JS
new Vue({
  el: '#app',
  data:{
  number: 1
  },
  methods:{
  count: function(){
  	this.number++;
  }

});
Take all that, throw it into Codepen or your favorite IDE, and we’ll go from here. Don’t forget to make sure you grab the Vue library no matter where you’re doing it!
2. Wrap the Changing Element in ‘transition’ Tags
Now that our counter works, we don’t need to look at the actual javascript again. The rest of this will take place in the HTML and SCSS. Let’s start with the HTML. We’re going to wrap whatever is going to be changing in between `transition` tags. You’ll also need to give it a name. The name is arbitrary, but keep whatever you pick handy as you’ll need it later.
3. Set the Key
So, what is happening now? Vue is now watching for the first child of that `transition` tag to change. Then, when a change does happen, it will check to see if there are any animations. If there are, Vue will wait until they are done before it removes the old and adds the new.
How does it know if that `span` tag (or whatever it happens to be) changed?
Right now, it doesn’t. It needs a key.
The key can also be pretty arbitrary; it just needs to be something that will change when you want the transition to happen. In our case, it’s when the `number` variable changes and we can actually just set the number as our key. That will end up looking something like this:
<div id="app">
  <div class="box">
  <transition name=”countUp”>
   <span :key=”number”>{{number}}</span>
  </transition>
  </div>
  <button @click="count">Count +</button>
</div>
Now, Vue knows that, when that key changes, it needs to let our animation run before it erases the old number.
4. Move Onto the SCSS
And, that does it for the HTML. Now all that’s left is to jump into the SCSS and set up our animations for the exiting and entering numbers.
Now, let’s see how we set this up. Basically, these are all CSS animations and transitions. What Vue is doing is adding different classes at different points during the transition period that we can call on and animate with CSS. I’m going to borrow a helpful diagram from the Vue Docs:
It can be VERY helpful to go check out the docs, especially for transitions on their website, but here’s the stuff we need to make our counter today.
The VUE Transitions You Need for the Counter
These are all class names and when they are applied to the elements to set up animations. For example `v-enter` is applied to the incoming element before it’s created and is removed one frame after the animation starts. So, if you give that class a property of `opacity: 0`, it will start as transparent and then when `v-enter` is removed, it will simply go back to its default, `opacity: 1`. If there’s a transition on the element then it will now start invisible and fade in.
Enter Stats
V-enter is added when the element is created and removed almost immediately, which basically gives you the ability to set its starting point.
V-enter-active is applied at the creation of the element and is removed when the animation is done.
V-enter-to is applied one frame after the animation begins and lasts to the end of the animation. Then, it is removed. Basically, it is the same as `v-enter-active`, but it isn’t added in advance.
Leave Stats
All of the Leave stats are as you would expect. They are opposite of their enter counterparts and applied to the old element.
V-leave is the starting point for the exiting element. It is applied when the exit is triggered and removed one frame later.
V-leave-active is applied at the start of the animation of the element and is removed when the animation is done.
V-leave-to is applied one frame after the animation begins and lasts to the end of the animation. Then, it is removed.
The last thing you need to know about them, for now, is this is where that name we gave to the transition comes in. In my case, it’s `countUp`. To call it in the CSS, we will replace the `V` in those class names with the name of our transition. So, `v-enter` is actually going to be `countUp-enter` for this app.
So here’s the plan: when the button is hit and the number increments up, it will trigger our animation, which will make the old number go up and out of the way while the new number rises up to take it’s place. Because our `.box` element has an `overflow: hidden` property, it should almost look like the new number is pushing the old up and out of site.
5. Add the Transition to the Outgoing Number
Let’s start with the outgoing number. We want it to go up and out of site. We are going to use `.countUp-leave-active` so the class is added as soon as the animation starts and will last until the animation is done. This could look something like:
.countUp-leave-active {
  transform: translateY(-200%);
  transition: all .2s ease-out;
}
It’s worth noting that you don’t need to add the transition property to these like I just did. If you add a transition to the `span` itself, that will work well enough most of the time. I did it there this time because I want the old number to ease out while the new one should ease-in. It just looks a bit smoother in this case.
Now, that should do it. Transition starts and `countUp-leave-active` is added to the old number. So, it will immediately transition up to -200% and out of view where it will be removed from the dom once the animation is done.
6. Add the Transition to the New Number
Now, let’s do the new number.
For this one, we are basically going to give it a starting point and let it transition to where it belongs on its own. That means using `countUp-enter`. We’ll have it start out 200% below where it belongs and then, after the first frame when `countUp-enter` is removed, it will transition to where it’s supposed to be.
.countUp-enter {
  transform: translateY(200%);
}
7. Apply the Transition to the Whole Animation
You’ll notice I did not add my transition property this time. This is because one frame into the animation when `countUp-enter` is removed, the transition will also be removed and it will kind of just snap to place. So, we’ll use `.countUp-enter-active` to make sure it’s applied for the whole animation.
.countUp-enter-active {
  transition: all .2s ease-in;
}
Now give it a try. Works but looks a little rough and jumpy right? That’s because the entering and exiting numbers are competing for the same space for a split second. We’ll fix this by staggering the animations.
8. Add Mode Attribute in HTML
Enter mode! If we hop back up to our HTML for a second, we can add an attribute called mode right next to where we declare the name. Mode comes in two flavors: out-in and in-out. Out-in will tell Vue not to start the incoming animation until the outgoing one finishes. In-out is the opposite. We need our old number out of the way before the new one comes in so we’ll use out-in.
<div id="app">
  <div class="box">
  <transition name=”countUp” mode=”out-in”>
   <span :key=”number”>{{number}}</span>
  </transition>
  </div>
  <button @click="count">Count +</button>
</div>
Now, everything should be in working order. When you hit the count up button, the old number should slide down out of sight and the new number slides down from the top of the box to take its place. If it doesn’t work, check out this codepen.
Bonus: Make it Count Down Too
What if we also want to count down as well? Well, we add another button that calls another function that just takes one away instead of adding one, right? We could do that, but it’ll look a little wonky.
This animation is made to look almost like the numbers are on a dial so lower numbers coming from the same place as higher numbers just won’t look right to the user. So, how do we do a different transition on the same element based off which function runs? A little like this:
1. Add a ‘countDown’ Function
First things first, let’s do the non-transition stuff. Go down into the `methods` in the Javascript and add a new function called `countDown`. It should look like this:
methods:{
  count: function(){
  	this.number++;
  },
  countDown: function(){
  	this.number--;
  }
}
2. Add a Button to Call the Function
Then, go to your HTML and add a button that calls that function.
<div id="app">
  <div class="box">
  <transition name="countUp" mode="out-in">
  	<span :key="number">{{number}}</span>
  </transition>
  </div>
  <button @click="count">Count ++</button>
  <button @click="countDown">Count --</button>
</div>
Ok, so that now works. But, when you count down or up it comes from the same direction, which looks dumb. So, let’s fix that.
3. Change the Name of the Data Variable
Go to the transition tag and add a colon to the front of `name`. This is shorthand for `v-bind:name`, which we want since we are going to change it using data variable. While we’re here, we’ll change the name to whatever we are going to call that data variable. I’m just calling it ‘transition’.
<div id="app">
  <div class="box">
  <transition :name="transition" mode="out-in">
  	<span :key="number">{{number}}</span>
  </transition>
  </div>
  <button @click="count">Count ++</button>
  <button @click="countDown">Count --</button>
</div>
4. Add it to the VUE Code
Now, go to the Vue code. First, we add that data variable with just a blank string.
data:{
  number: 0,
  transition: ''
  }
5. Add in the Transition
Next, we’ll go down to our two counting functions and put in a different transition name based off of the way we want it to go.
methods:{
  count: function(){
  	this.transition = 'countUp';
  	this.number++;
  },
  countDown: function(){
  	this.transition = 'countDown';
  	this.number--;
  }
As you can see, when we count up, the transition is our normal old `countUp` transition just like before, but when we count down, a new `countDown` transition is set as the transition.
6. Set up the Animations in the SCSS
Now, all that’s left is to go into the SCSS and set up the `countDown` animations. You can do this by basically copying/pasting the `countUp` stuff, changing `countUp` to `countDown`, and switching the 200% and -200%.
.countUp-enter-active {
  transition: all .2s ease-in;
}
.countUp-leave-active {
  transform: translateY(200%);
  transition: all .2s ease-out;
}
.countUp-enter {
  transform: translateY(-200%);
}

.countDown-enter-active {
  transition: all .2s ease-in;
}
.countDown-leave-active {
  transform: translateY(-200%);
  transition: all .2s ease-out;
}
.countDown-enter {
  transform: translateY(200%);
}
And, that’s it! You did it, you winner, you! If something doesn’t seem quite right or you want to see my code for this, check out this codepen. Tune in next time when we tackle group transitions.
If you’re new to Vue and want to try something else, check out how to create a random array picker with Vue for beginners!

View Comments