How to Build a Random Array Picker With Svelte
September 24, 2020 By Spenser Peiffer, aka Snazzy Boi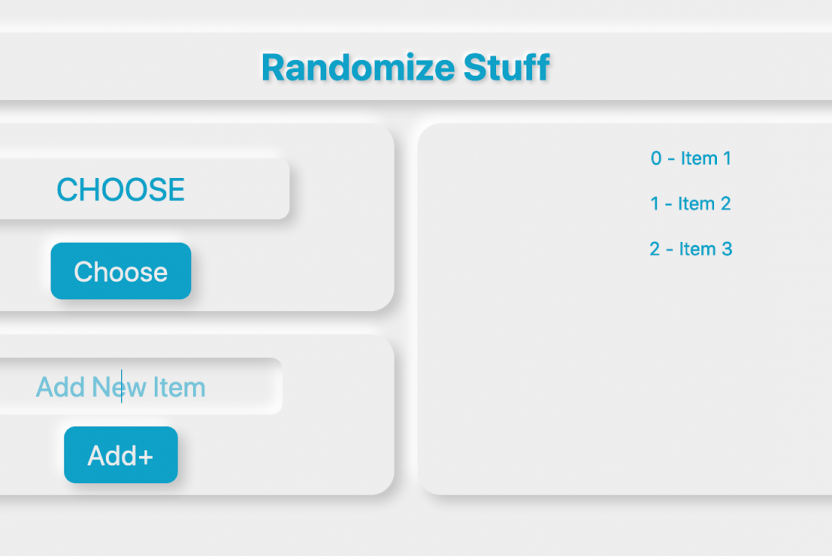
Svelte.js can be a useful tool for some types of projects. Here’s a quick intro to Svelte.js and how to build a random array picker with Svelte:
Intro to Svelte.js
Although Svelte.js does serve a similar role and does similar things to Vue.js and React, it has one big key difference.
Svelte is a Compiler, Not a Framework
Svelte is not a framework at all. Vue and React can’t be understood natively by a browser. This is why we need to include the actual framework and dependencies when we want to use those. Svelte is a compiler, which means it takes all the Svelte code and turns it into vanilla javascript when you run the build.
A Svelte Project is Lighter Than the Heavier Frameworks
Why is this cool? For one thing, you don’t need to include a whole framework in your page. This means a Svelte project that does the same things a Vue project does will always be a lot lighter. Not to mention, that’s at least one less HTTP request on the page load, which can help you increase page speed.
How to Build a Random Array Picker with Svelte
Now that I’ve convinced you that learning Svelte is a good idea, we can proceed onto the fun part: let’s build something! We’ll build a pretty basic little app just to give you a general idea of the syntax and give you a feel for Svelte. If you are familiar with React or Vue, this should feel pretty familiar.
We are going to make a random array picker app, where we can add items to an array and then hit a button to make it randomly pick one of the array items. Just make sure you have node and npx installed on your machine.
1. Make Sure You Have node and npx
To check if you have these go to the terminal and type node -v.
If you get a version number, then you have node. If not, download it here.
Then, do the same with npx -v.
Same thing. If you don’t get a version number, then run npm install -g npx.
2. Create a Project
Now that we have that all settled, we can make our project. Don’t make a project root folder yet. Just cd into wherever you want the project folder to be. Then, we will run npx degit sveltejs/template my-svelte-project.
You can replace “my-svelte-project” with whatever you want to name your root folder. This is going to create your root. Then, download a boilerplate project. Unlike React and Vue webpacks, we aren’t done yet. Unlike the other two, it did not download the dependencies just yet.
But, it did make a “package.json”. At this point, if you wanted to, you can actually open that up and add and any dependencies you want that aren’t there. But, today, we aren’t doing that.
3. Install the Boilerplate and Start the Local Server
So, now we run npm install. It does its thing and now we have our boilerplate.
Run npm run dev to start the local server and we’re in business. The default is “localhost:5000/”. So, unless you specified otherwise, you can open that in the browser, and we have our webpage.
Our app is ready now, so let’s start coding. There will be a good bit of stuff in your project root folder now, but, for the time being, you can really just ignore most of it. Mainly, we’ll be in the “src” folder and the “public” folder.
“Src” is where the components and app file will be while the “public” folder will hold things like the CSS, images, and other page dependencies that don’t need to be processed when we build.
4. Start in “src”, Clean up, and Add Styles
Let’s start in “src” by opening up App.svelte. This is the main application file. We can take a second to do a bit of cleanup and remove some of the boilerplate stuff.
Start by removing everything between the script tags. Then, change the h1 contents to “Randomize Stuff” or whatever you want to call this. After that, delete the p tag completely. Next, remove all the styles below it.
For the sake of keeping this simple, we’ll just put all the styles in the CSS file. If you just want to copy my styles, you can copy them from here.
The end result should look something like this if you use my styles:
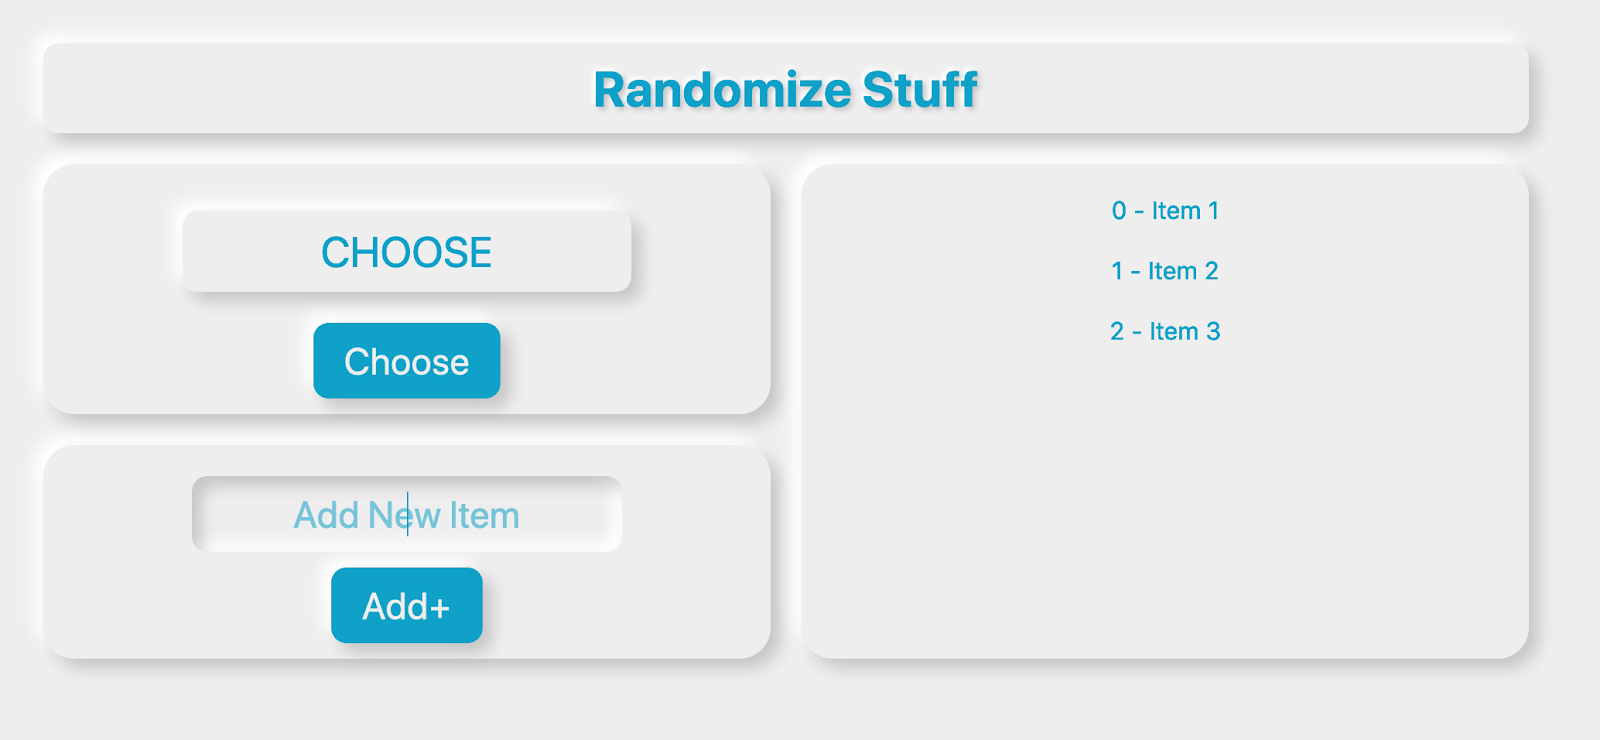
You’ll notice we have a title and three sections: The randomizer, a form to add items to the list, and the list itself. If you did copy and paste my CSS, then make sure you use the same class names as me.
5. Add Some Functionality With a Form
Let’s add our first bit of functionality by making the form so we can add to our list and then loop through our list and show what’s in there.
Add the HTML Below the H1
Now, we can start by just adding our HTML below the h1.
<div class="add-box">
   <form>
     <input type="text" placeholder="Add New Item">
     <button class="btn" type="submit">Add+</button>
   </form>
 </div>
Bind the Input to a Reactive Variable
Now, let’s bind the input to a reactive variable. Go up to that empty script tag and make a regular old variable like so:
<script>
 let newItem = '';
</script>
And then bind it to the input like this:
<input type="text" bind:value={newItem} placeholder="Add New Item">
Now is probably a good time to note that Svelte uses single curly braces for reactive items.
Create a List
Since we now have a place to put our new list item, we need a list to put that in. In the same place as newItem, we can add an empty array.
let list = []
Add newItem to the Array
Lastly, we need a function to add newItem to our array. We can do this by making a function in the script.
const addItem = (e) => {
   e.preventDefault();
   if(newItem != ''){
     list.push({item: newItem, id: new Date().getTime()});
     newItem = '';
   }
 }
Briefly, what’s happening is that we are taking in the event and preventing default so the page doesn’t reload. Then, we have an if to make sure the input wasn’t empty. Next, we are taking newItem and adding it to an object along with the current Unix time as the id (we will need an id later). Lastly, we are clearing out newItem, so we are ready to add another item.
Add a Click Listener to the Submit Button
Now, we just need to add a click listener to the submit button to fire the function.
<button class="btn" type="submit" on:click={addItem}>Add+</button>
Loop Through and Display Each List Item
Boom. Done. Okay, now let’s loop through and display each list item. After the “.addbox” div, add this:
<ul>
   {#each list as item, i (item.id)}
     <li>{i + 1} - {item.item}</li>
   {/each}
 </ul>
#each is svelte’s version of a v-for. As you can see, we get list. Then, put as followed by what each object will be called, which is item in this case. Then, add a comma followed by an i, which is the index. Finally, we use our item id as a key.
6. Add the Randomizing Function
Now that we have that, we can finally add the randomizing function. Adding it would be more of the same that we’ve been doing, so let’s use this time to learn how to make a component.
Just for a quick recap: a component is another file that represents reusable code and can include HTML, Javascript, and CSS.
Add a New File in “src” and Create the Component
Start by adding a new file inside “src” called “Randomizer.svelte”. Then, add this code:
<script>
 export let list;
 let chosen = 'Choose';

 const choose = (e) => {
   e.preventDefault();
   chosen = list[Math.floor(Math.random() * list.length)].item.toUpperCase();
 }
</script>
<div class="randomize-box">
 <p class="chosen">{chosen}</p>

 <button class="btn" on:click={choose}>Choose</button>
</div>
It is not unlike what we’ve been doing, but let’s run through it quickly.
How to Take in Props
This is how you take in props. We are going to take list from our main app page.
export let list;
What the Chosen Item Looks Like
This is what our chosen item will be. We can have the word “Choose” in there for now as a placeholder.
let chosen = 'Choose';
What the Randomizer Function Looks Like
Our function that randomly picks an item from the list looks like this:
const choose = (e) => {
   e.preventDefault();
   chosen = list[Math.floor(Math.random() * list.length)].item.toUpperCase();
 }
How to Display the chosen Variable
The following displays the chosen variable:
<p class="chosen">{chosen}</p>
How the Button Binds to the choose Function
The following line of code binds the button with click listener to the choose function:
<button class="btn" on:click={choose}>Choose</button>
7. Import the Component on the Main App Page
Now, all we need to do is import this component on our main app page. Let’s go back to “App.svelte” and put this in the script tags at the very top:
import Randomizer from './Randomizer.svelte';
8. Place the Randomizer Component Where You Want it in the File
And, finally, we can place our component wherever and however many times we want in this file now. We can put ours right after the title like so:
<h1>Randomize Stuff</h1>
<Randomizer list={list}/>
As you can see, we simply make it a “Randomizer” tag with our “list” prop. And, that’s it. It should all work.
The Complete Random Array Picker in Svelte
If you want to see the project, feel free to check it out here on GitHub. Otherwise, here is what your “App.svelte” should look like:
<script>
import Randomizer from './Randomizer.svelte';
 let list=[];
 let newItem =''

 const addItem = (e) => {
   e.preventDefault();
   if(newItem != ''){
     list.push({item: newItem, id: new Date().getTime()});
     newItem = '';
   }
 }
</script>

<main>
<h1>Randomize Stuff</h1>
<Randomizer list={list}/>
<div class="add-box">
 <form>
   <input type="text" bind:value={newItem} placeholder="Add New Item">
   <button class="btn" type="submit" on:click={addItem}>Add+</button>
 </form>
</div>
<div class="list-box">

 <ul>
   {#each list as item, i (item.id)}
     <li>{i + 1} - d{item.item}</li>
   {/each}
 </ul>
</div>

</main>
The Full Randomizer Component With Svelte
And, here is the “Randomizer.svelte” component:
<script>
 export let list;
 let chosen = 'Choose';

 const choose = (e) => {
   e.preventDefault();
   chosen = list[Math.floor(Math.random() * list.length)].item.toUpperCase();
 }
</script>
<div class="randomize-box">
 <p class="chosen">{chosen}</p>

 <button class="btn" on:click={choose}>Choose</button>
</div>
This is one way to build a random array picker with Svelte.js. Take a look at how to create a random array picker with Vue if you want to try it in something else.

View Comments