How to Build a Web App With Vue CLI and Router for Beginners
January 16, 2020 By Spenser Peiffer, aka Snazzy Boi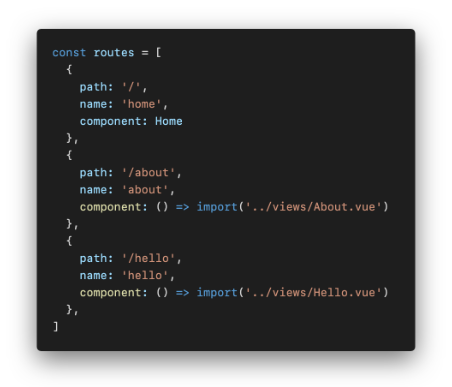
It’s relatively straightforward to add some Vue.js to a normal web page when you just need a bit of DOM manipulation here and there. But, what if you want to create a whole web app using Vue.js? You can! Luckily, Vue CLI exists for this very reason.
Vue CLI is a very powerful tool for deploying pretty complex and powerful web apps with most of the heavy lifting being done in the background. Vue-router is something you use to make single-page applications seem like multiple different pages. You don’t actually need to use Vue CLI to use Vue-router, but it can be pretty obnoxious to use in a standard implementation.
The big benefit of using these together is that, once the page loads the first time, you have everything unless you have to make server calls to the database or something later. That means pages, or “views”, load very fast and even make page transitions both possible and pretty easy.
Here’s how to build a web app with Vue CLI and Router for beginners:
1. Install Vue CLI
Start off by installing Vue CLI. For this example, we’ll be using npm but you can also use yarn. To start go ahead and run this in your terminal:
`npm install -g @vue/cli`
That should install Vue CLI globally on your machine, which allows you to spin up a project whenever you want.
2. Create Your Project
Next, we will create our project. There are two ways to go about making the project folder. There isn’t much of a difference in the method you use as it’s mostly personal preference.
Method #1 – Use Vue Create-My-Project-Name
The first way to create your project is to go into whatever folder you want this project to live in and run:
`vue create my-project-name`
This will create the project folder for you and put all the files inside it.
Method #2 – Use Vue Create
The second way to create your project if you already made a project folder is to just create directly in that folder. You can cd into that folder and run:
`vue create `
This will just install all the files we’ll need in whatever folder you are in.
3. Configure Packages and Features
We made a project called “vue-route-project” and ran the create command. Now, it will ask a bunch of questions about what packages and features we want for this project. You can always add or remove things later, but it’s usually a bit easier to do it at the beginning.
The project will also offer us some common configurations of popular packages. For this example, let’s just grab the standard option. At the time of writing, this includes router, node-sass, babel, and eslint. Then, it will think for a bit and download everything, which should take about 10 seconds.
4. Start Up a Local Server With Live Updates
Once finished it’ll tell you to cd into the folder if you aren’t already, then run:
`npm run serve`
This will start up a local server with live updates. It makes working on these projects very nice. After that thinks for another couple seconds, it will tell you where to find your local server.
For this example, we used “http://localhost:8080/”, which will come into play later. Copy and paste your local server location into the browser and you’ll see the boilerplate the CLI provided.
5. Open Your New Folder in Your Favorite IDE
For the time being, we are done in the terminal and it’s time to code. Just leave the terminal window running the server open. To look at your code, open your new folder in your favorite IDE. We’ll be using VSCode, but you can use whatever you want really.
Now, you may notice there are A LOT of folders and files in here. Don’t worry; you’ll be able to just ignore a lot of that, at least until you get a lot more experience in here. In fact, you can ignore all the files that are in the root for today.
Those are mostly config files for all the packages we are running, but Vue CLI was nice enough to set them up so you wouldn’t really touch them unless you had to alter a package configuration for some reason. The “public” folder can also mostly be ignored. That’s where we put static things not being used in the app like the “index.html” and favicon.
What You Should See in the “src” Folder
We will be working in the “src” folder. There should be two files and four folders. Most of the folders are pretty self-explanatory, but the files are a little less so. Very basically, you should see two types of files:
App.vue
This is the main app component. Every view and component is a child of this one. We’ll delve more into that later.
Main.js
This is where you will configure the initialization of the Vue instance. For this project, it’s already set up well enough and we don’t need to mess with it today.
6. Create a View
Take a look at the webpage Vue CLI built for us. At the top are the two links “home” and “about”. Clicking between them looks like any old regular navigation to go from one page to another. The sneaky bit is this is all one page really.
If you go into the inspector and watch the network activity, you’ll notice that there are no HTTP requests going in or out when you change views. You may even notice it changes the path in the URL bar just like an actual webpage. This means your app can behave a little more like an actual app rather than a webpage.
Now, let’s look at adding a view. Start by going into the “views” folder and adding a file. For the sake of this example, we’re calling it “Hello.vue”. Because views are technically just components, that means within each of these views it can have its own HTML template, scripts, and styles.
For the HTML, we will make a “template” element. Inside of that template element, we will have some kind of HTML element. Usually, this is a div. It should look something like this:
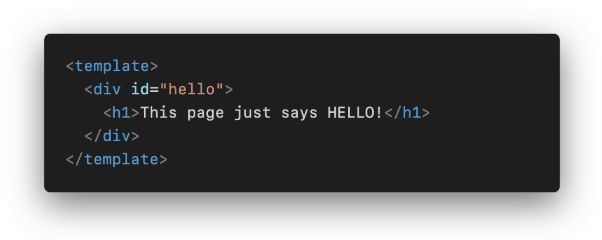
Make Sure There is Only One Direct Child of the Template Elements
Note: You can only have one direct child of the template elements. For example, #hello cannot have any siblings here. Within #hello, you can put whatever you want in terms of HTML.
We just put an H1 in there so the page says something. Technically, this is all you need. You can also have styles and script in here too, but for this demonstration, we’ll keep it simple for now.
7. Add the View as a Route
Now that we have our new view, let’s add it as a route. To do that, we will go into the “router” folder and open “index.js”. This is sort of the config file for the router. At about line 7, you’ll see an array called “routes” with some objects in it.
Each object is a route and within that object, you can set a whole slew of settings. But, for today, we’ll keep it as basic as possible. Go ahead and put a comma after the curly brace for the “about” object and then copy and paste the whole object.
3 Important Items in the Object
Looking at each of the items in the object, you should see what needs to be changed.
Path
This is how it will show up in the URL bar and can be used for navigation later.
Name
This is the name of the component.
Component
This is a function that is going and fetching the actual component file so that the router knows which one to use.
You can go through and change everything so it makes sense for our new “Hello.vue” view.
Make Sure Your Naming Makes Sense
Note: The first two things you can actually make into whatever you want and it will work fine. Just be sure to use things that make sense. Otherwise, things could get confusing if this app were to get more complex. Your “routes” array should look something like this now:
8. Add a Link to the Navigation
Now, if we jump back to the webpage in the browser and type “localhost:8080/hello” into the address bar, we should see our “Hello” page. We want to be able to navigate to it using our nav, so let’s do that next.
For that, we can go ahead into the “App.vue” in the “src” folder. In the HTML section, you’ll see #nav and, within that element, you’ll see some strange new elements called “router-links”. These will later get turned into normal links when we compile our code for production so any CSS written for them should target them as such.
The easiest way to add a link is to copy and paste the one before it and change whatever needs changing. You should end up with something that looks like this:
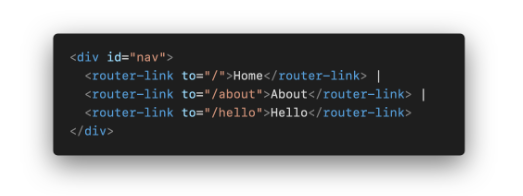
You can now add and remove routes like that until the cows come home.
9. Add Some Transitions
Before we end, let’s add one final touch. You can add Vue transitions and apply them to route changes very easily.
Just below the closing tag for #nav is an element called “router-view”. This is where the views are actually put relative to the rest of the layout on “App.vue”. This is good to know for two reasons:
Easily Add Static Elements
You can add static elements that never change to the page so you only have to do it once. Much in the same way the nav is put above it and never really changes, you could also add a footer or maybe a sidebar.
Easily Add Transitions
We can also wrap that element in a transition tag and animate the page transition. For this example, we’ll make one called “fade” that will fade out the old route and fade in the new one.
We can start by wrapping the “router-view” with a “transition” tag and name it. We’ve also set the mode to “out-in” so that the previous view is gone before the new one comes in. This will prevent any jumps.
You should end up with something that looks like this:
![]()
Now, we can scroll down to the bottom and set up the styles using the Vue.js transition classes. Something simple like this looks nice:
![]()
And, that’s all it takes! Now, your page transitions look buttery smooth. Needless to say, this can all get way more complex, but that’s how to build a web app with Vue CLI and Router for beginners.

hi, I am facing trouble with running it.
when I started to customize the script of app.vue then it shows the error message here: https://ibb.co/1vVw5Lt
I am looking forward to waiting for your reply.
Hi Soliman thanks for reaching out!
So one of the things that comes with Vue CLI is a Javascript linter which basically just exists to not only make sure you aren’t going to break anything but also make sure you don’t have redundancies that can bog things down. That 2nd thing is whats happening here. You are importing and declaring the “Helloworld” component and then not using it which makes the linter mad. Best way to fix it is by not declaring it if you aren’t going to use it. Go down to the script tags and remove “import HelloWorld from ‘@/components/HelloWorld.vue'” then also remove “Helloworld” from the “components{ Helloworld }”. You can just leave the components {} empty for now. This is actually a really common and annoying problem that gets in my way a lot. Anytime you get that “*name* is defined but never used” message you can just go to where ever that variable or import is called and just remove it or use it. Its just saying you declared something and never used it for anything. Hope that helps and feel free to reach out again if you hit more snags.