How to Create a Floating HTML Element that Stays in the Sidebar When Scrolling
January 24, 2017 By Andrew Gehman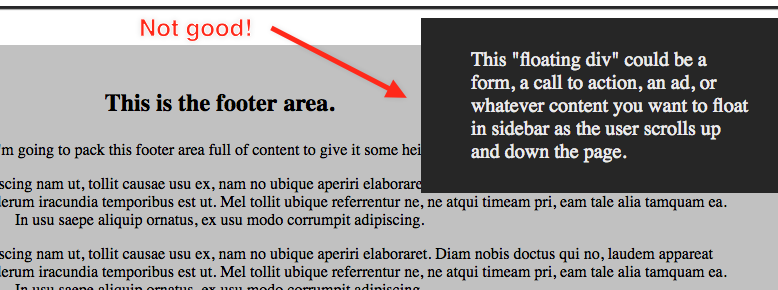
Sometimes you have important information in the sidebar of your website that you want to keep in constant view of your site’s visitors, such as contact information, or an advertisement for your goods and services, even as they scroll down the page.
Here’s a method you can use to keep that essential information ‘floating’ within the sidebar (and thus staying within their view) as visitors to your site scroll through your content. And, if you have additional content below the sidebar, we’ll show you how to prevent that ‘floating’ content from ‘breaking out’ of the bottom of the sidebar and obscuring that additional page content below it.
When and Why Might You Want a Floating Sidebar?
With a standard web document layout, if you have a long article with loads of content that requires the user to do a lot of scrolling, important content in the sidebar would scroll by and be out of view of the reader (and possibly also out of mind) before reaching the end of the article. This method allows you to keep that important information on the screen and visible to the reader as they read through the entire desired content on the page.
You could just fix the content to the top of the document at a certain point and be done with it. However, if you have additional content below the sidebar, such as a large footer area, or additional content areas, you may not want the floating content to flow over the important information below the sidebar. With that in mind, we’ll take additional steps to keep that floating content from ‘breaking out’ below the sidebar and obscuring any of the content that appears below that sidebar. The content ‘floats in the sidebar,’ but stops before obscuring any content below it.
Rather than copy the mass of HTML code I used for my example, I’ll link to the pen in Codepen.
See the Pen Floating Sidebar div by Andrew Gehman (@AndrewGehman) on CodePen.
How to Create a Floating HTML Element that Stays in the Sidebar When Scrolling
1. Calculate the Right Distance in Pixels
First, we want to calculate the distance in pixels from the top of the document to the top the floating element. When the user scrolls down that number of pixels, we know the element with our ‘floating content’ will be located at the top of the window. At that point, we’ll use Javascript to add a CSS class to the element that fixes it there at the top of the window.
To calculate that distance to the top of the document, we can use jQuery’s offset method. Offset will return the current position of an element (left and top) relative to the document (We only need the top).
var topPosition = $('.floating-div').offset().top;
In our case, the ‘.floating-div’ has a top margin of 10px, so we will factor that into our calculation and adjust our javascript slightly. We’ll remove 10px from the result to keep the appearance of 10px top margin as we scroll.
var topPosition = $('.floating-div').offset().top - 10;

2. Fix the Element to the Top of the Document
To fix the element to the top of the document, I’ll create a CSS class called ‘sticky’ with a position of fixed, 10px from the top. (Note: I’ve used the CSS calc function to give the div a width since it is no longer being ‘contained’ by the width of the sidebar div. You could, of course, just give it a fixed width if that fits your needs. )
.sticky {
 position: fixed;
 top: 10px;
 right:18px;
 margin: 0;
 width:calc(33.33% - 25px);
}
… and I’ll use jQuery’s addClass method to add the CSS class is the code above to our floating element.
$('.floating-div').addClass('sticky');
3. Calculate the Scrolling Distance
Now, we don’t want our $(‘.floating-div’) to stay at the top of the window if the user scrolls past the bottom end of the sidebar. So, we need to also calculate the scrolling distance between to the top of the document, and the top of the floating element once we reach the end of the sidebar. Then, we can change the CSS so that the floating element is absolutely positioned at the bottom of the sidebar, rather than continuing to stay fixed and thus obscuring other content as the user continues to scroll down past the sidebar.
There are a few ways to find this scrolling distance. You could calculate the height of all the elements that make up the distance from the top of the document the end of the sidebar and then subtract the height of the floating element. Or, you could calculate the distance from the top of the document to the footer (or the content below the sidebar) and subtract the height of the floating element. The latter is what I’ll be using for my example.
var footerFromTop = $('footer').offset().top;
Similar to what we did when we used offset earlier, when calculating this scrolling distance we’ll remove 20px from the result since we need to consider our absolute bottom position (which we will set shortly in CSS) and leave a little space to prevent our div from appearing to ‘bounce’ as it reaches the bottom of our content. We’ll store this in a variable called ‘absPosition.’
var absPosition = footerFromTop - floatingDivHeight - 20;
 So when the user scrolls to the bottom of the sidebar, we’ll want to switch from position: fixed, to position: absolute and place the floating content at the bottom of the sidebar. So, we’ll create a class called ‘abs’ with a position of absolute, 10px from the bottom.
.abs {
   position: absolute;
   bottom: 10px;
   right:10px;
   width:calc(33.33% - 20px);
}
You might think we’ll position this relative to the sidebar, and in some cases, that might work. In our case however, the sidebar will only take on the height of the child element (which is the element we want to float) and thus won’t position the floating element at the bottom of the content. So, we’ll need to add some more CSS to help us out.
4. Absolutely Position the Floating Content to the Bottom
We’re going to place position:relative on the div that wraps the primary content (#primary-content-wrap) and the sidebar. We’ll also need to create a clearfix class and add it to the #primary-content-wrap div to prevent the div from collapsing since all child elements are floated. So, we’ll be absolutely positioning the floating content to the bottom of the primary-content-wrap div since it’s height will be the same as the height of the content within it.
#primary-content-wrap {
  position: relative;
}

.clearfix:after {
 content:"";
 display:block;
 clear:both;
}
The image below shows the outline of the primary-content-wrap div in red and the floating element positioned at the bottom of that div. This isn’t what the screen will look like when we are done, it just shows the positioning of the floating content in relation to the primary-content-wrap div.

5. Create the Rest of the Code
Now to create the rest of the code to bring it all together. In the code snippet below, you’ll see that I’ve defined our variables at the top.
// variables
 var topPosition = $('.floating-div').offset().top - 10;
 var floatingDivHeight = $('.floating-div').outerHeight();
 var footerFromTop = $('footer').offset().top;
 var absPosition = footerFromTop - floatingDivHeight - 20;
Next is the primary function to make all this goodness happen.
$(window).scroll(function(){
  // code goes here....
});
As the user scrolls, we’ll use conditions to check where our floating content is in relation to the document.
First Conditional
In the first conditional, we are using the $(window).scrollTop to check the current scroll position. If that scroll position becomes greater than the topPosition variable, which means the user has scrolled to (or past) the top of the floating content, but has not reached the position of the top of the floating element when it is at the bottom of the primary-content-wrap div (absPosition), we add the sticky class and make sure the .abs class is removed.
Second Conditional
The second conditional (else if) looks to see if the user has scrolled past the topPosition and also has scrolled past the absPosition. If both conditions are met, the ‘sticky’ class is removed and the ‘abs’ class is added, thus positioning the floating element at the bottom of the the primary-content-wrap div.
Neither Conditional
And, finally, if neither conditional is met, both classes are removed and the floating div goes back to it’s normal position in the document. Here’s the full Javascript we’ve used:
 // variables
  var topPosition = $('.floating-div').offset().top - 10;
  var floatingDivHeight = $('.floating-div').outerHeight();
  var footerFromTop = $('footer').offset().top;
  var absPosition = footerFromTop - floatingDivHeight - 20;

  $(window).scroll(function() {

   if (($(window).scrollTop() > topPosition) && ($(window).scrollTop() < absPosition)) {
    $('.floating-div').addClass('sticky');
    $('.floating-div').removeClass('abs');

   }else if (($(window).scrollTop() > topPosition) && ($(window).scrollTop() > absPosition)) {
    $('.floating-div').removeClass('sticky');
    $('.floating-div').addClass('abs');

   }else {
    $('.floating-div').removeClass('sticky');
    $('.floating-div').removeClass('abs');
   }
 });
Some Considerations to Keep in Mind
Now, we’re just about finished. You’ll want to keep a few things in mind. I touched on this a bit earlier, but depending on your layout and styles, you may need to adjust the offset(s) and or the width of your floating div to keep it smooth and consistent as you scroll. You could (perhaps should) also assign some of your jQuery selectors like ‘$(window)’ and ‘$(‘.floating-div’)’ to variables at the beginning of your code, and then use those variables throughout rather than the selectors. This will improve the performance of your code.
Also, this likely is not a feature you want to use for mobile. One solution for this problem is to use Javascript’s window.MatchMedia(), along with a media query to ensure our code only runs at certain break points.
The final code I’ve used is below. You’ll notice I refactored the code and replaced some of my jQuery selectors with variables, and used the aforementioned window.MatchMedia() with a min-width of 768px so my floating sidebar won’t run on smaller screens.
  // variables
   var topPosition = $('.floating-div').offset().top - 10;
   var floatingDivHeight = $('.floating-div').outerHeight();
   var footerFromTop = $('footer').offset().top;
   var absPosition = footerFromTop - floatingDivHeight - 20;
   var win = $(window);
   var floatingDiv = $('.floating-div');

 win.scroll(function() {
  if (window.matchMedia('(min-width: 768px)').matches) {
   if ((win.scrollTop() > topPosition) && (win.scrollTop() < absPosition)) {
    floatingDiv.addClass('sticky');
    floatingDiv.removeClass('abs');

   } else if ((win.scrollTop() > topPosition) && (win.scrollTop() > absPosition)) {
    floatingDiv.removeClass('sticky');
    floatingDiv.addClass('abs');

   } else {
    floatingDiv.removeClass('sticky');
    floatingDiv.removeClass('abs');
   }
  }
 });
Now, you should have a cool floating element in your sidebar, that floats along with your content, but doesn’t ‘break out’ below the sidebar when you have more content below.

Check out the full project on Codepen!

It is not working in my PC. The right sidebar did not stay when scrolling. Do you have source I can download for a test?
Yes, there is a link to a codepen at the bottom of the post, where you can see the whole thing in action.
Great, exactly what I’m looking for.
One small issue though: if you resize your window, it starts acting funky. Is it possible to have it “recalculate” its limitations when the window resizes? (I don’t know much about JS, but I think that’s possible.)
Hi Bevans, it would certainly be possible to bind to window resize events as well, just change
$(window).scroll(function(){ …
to
$(window).bind(‘scroll resize’, function() { …
Be careful doing this, though, as there may be performance implications. You will want to read up on throttling and debouncing if you’re getting into more complicated functionality (which was not discussed in this blog post)